
In this guide, we’ll walk you through everything you need to know about grow tents and how to set them up effectively.
We’ve packed this guide with practical, actionable advice, and of course, plenty of diagrams to help you visualize the process.
By the end of this guide, you’ll be well-equipped to set up your own grow tent and start reaping the benefits of indoor gardening.
Key Takeaways (Summary):
- A successful grow tent setup is crucial for thriving indoor gardening. It provides a controlled environment for plants to grow and flourish.
- Essential components of a grow tent setup include lighting, ventilation, temperature and humidity control, and choosing the right planting medium.
- Monitoring and controlling temperature and humidity levels are vital for creating the perfect environment for plant growth.
- Choosing the right planting medium, such as soil, coco coir, or hydroponics, depends on plant preferences and desired outcomes.
- Regular maintenance tasks like watering, nutrient management, pruning, pest control, and monitoring plant health are necessary for optimal results.
- Harvesting requires proper timing and care to ensure the fruits of your labor are enjoyed at their peak.
- Common mistakes to avoid include overcrowding, improper watering, and lighting mistakes that can impact plant health and growth.

The Basics of Grow Tents

What is a Grow Tent and Why Use One?
So, let’s start with the basics. What exactly is a grow tent?
A grow tent is essentially a portable, reusable grow room. Made of flexible materials and equipped with reflective interiors, grow tents provide an ideal environment for indoor gardening. They help control light, temperature, and humidity, which are all crucial for plant growth.
But why to use a grow tent, you ask? Well, there are several reasons:
- Control: Grow tents give you control over your growing environment, which can lead to healthier plants and better yields.
- Efficiency: The reflective interior of a grow tent maximizes light efficiency, ensuring your plants get the light they need without wasting energy.
- Flexibility: Grow tents come in various sizes and can be set up and taken down easily, making them perfect for indoor spaces.
- Cleanliness: Grow tents help contain the mess that often comes with gardening, keeping your indoor space clean.
If you’re still deciding between a grow box and a grow tent, this comparison might help.
Different Types of Grow Tents: Choosing the Right One for You
Grow tents come in various shapes and sizes, and choosing the right one for you depends on your specific needs and circumstances. Here are a few things to consider:
- Size: Choose a tent size that fits your space and can accommodate the number of plants you plan to grow. Remember, plants need room to grow and air to breathe, so avoid overcrowding.
- Height: Consider the height of your grow tent. Taller tents allow for larger plants and help accommodate hanging lights and ventilation systems.
- Quality: Look for a tent with sturdy construction, durable materials, and a high-quality zipper. A good grow tent should stand up to regular use.
- Features: Consider grow tents with useful features like observation windows, tool pockets, and removable floor trays for easy cleaning.
Remember, the right grow tent for you depends on your individual needs and goals. Take the time to consider what you want from your indoor gardening experience, and choose a tent that meets those needs.
If you’re interested in LED lights, you might want to check out the best LED grow lights for a 5×5 tent.
Essential Components of a Grow Tent Setup
Lighting: The Heartbeat of Your Indoor Garden
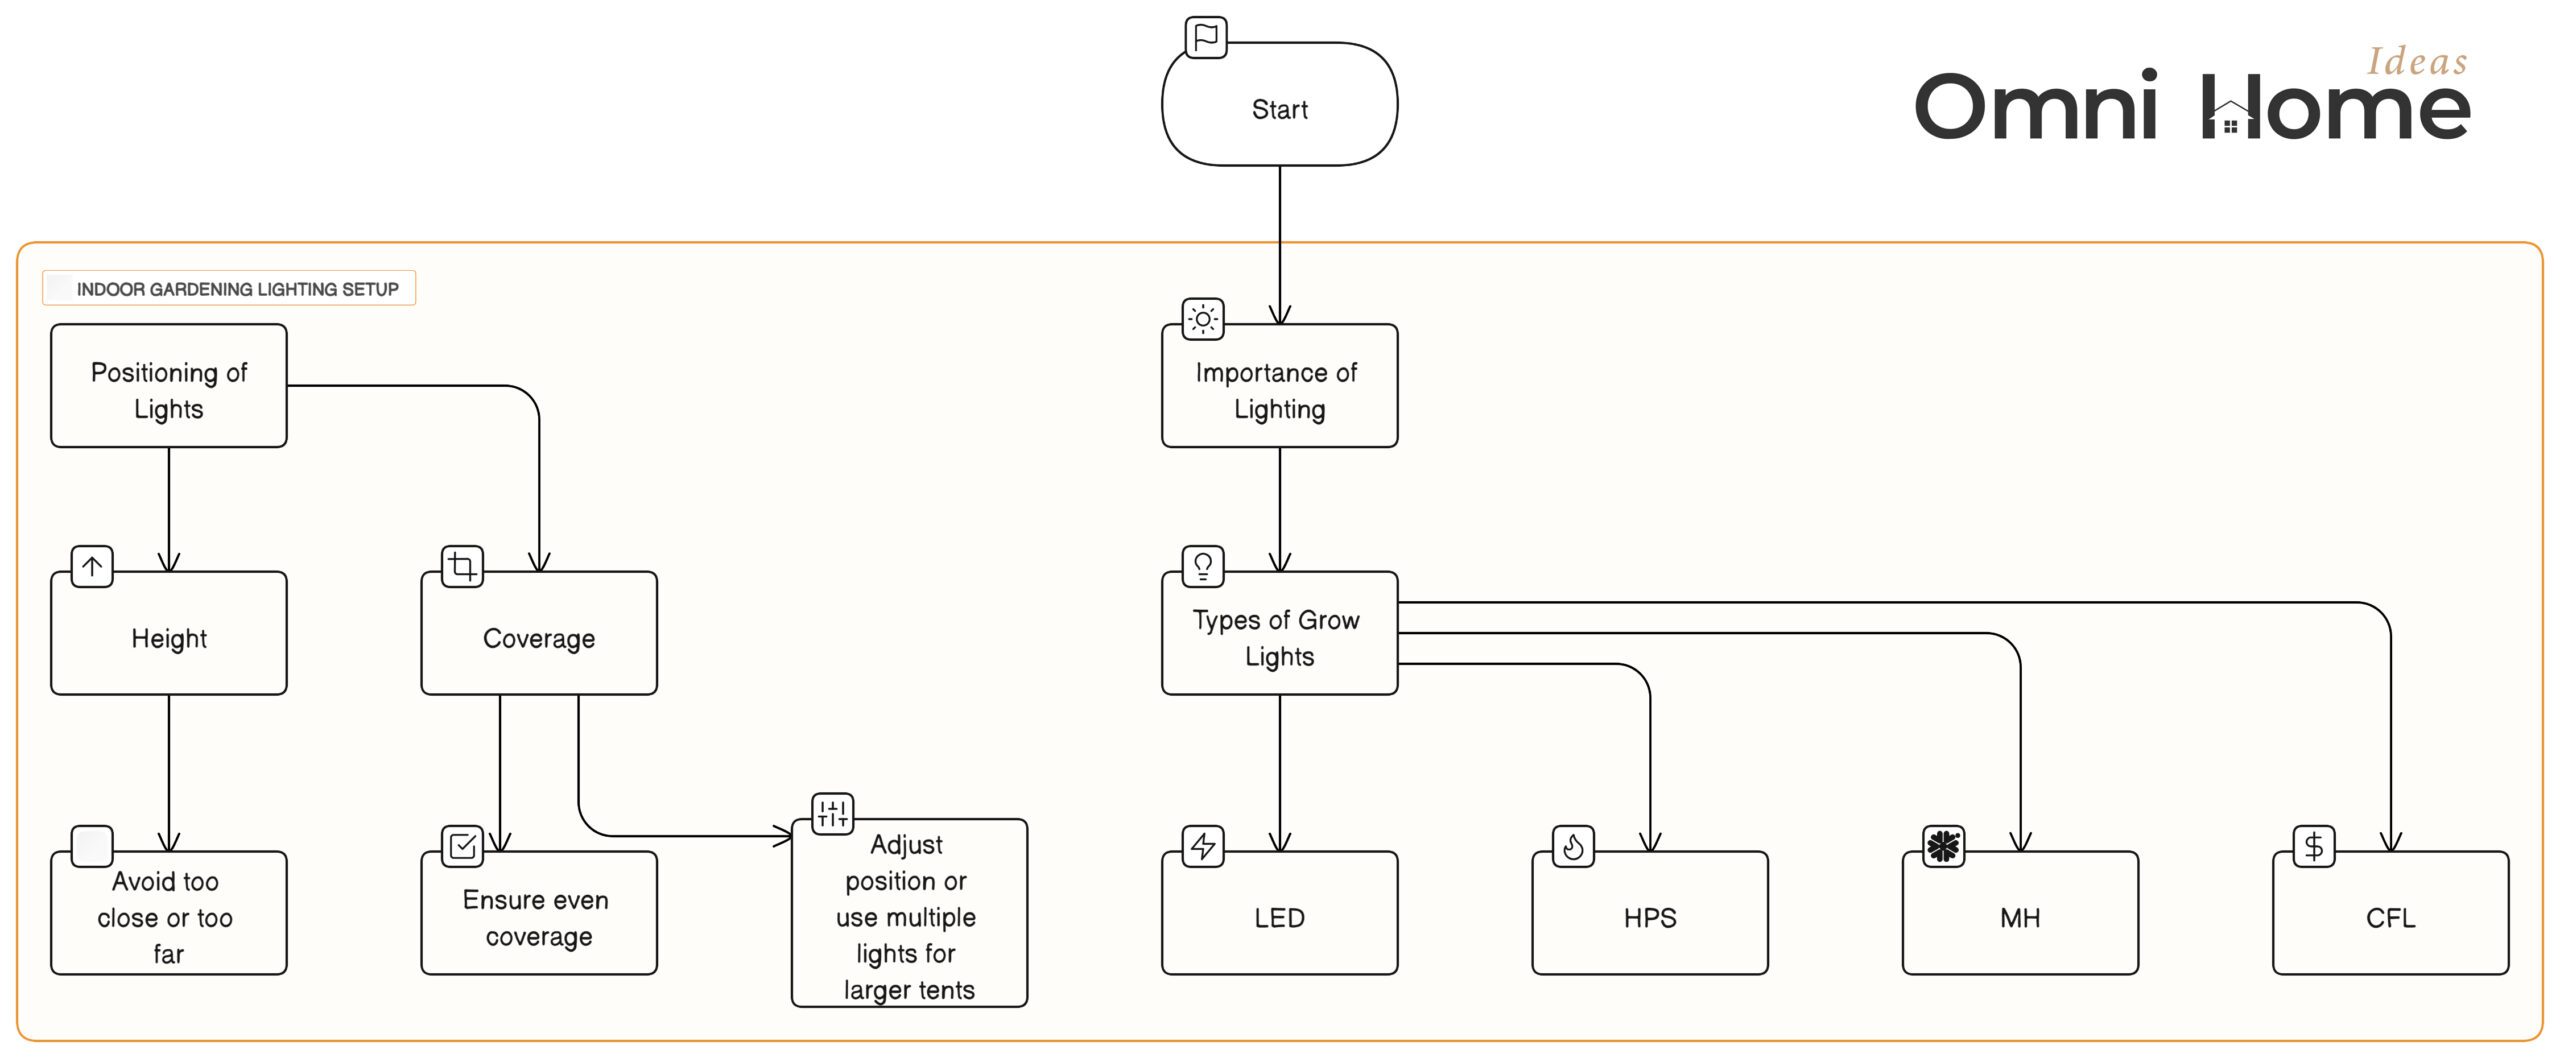
Light is to plants what the heartbeat is to humans – absolutely essential. In the absence of natural sunlight, your indoor garden relies on artificial lighting to provide the energy your plants need to grow.
Types of Grow Lights: LED, HPS, and More
There are several types of grow lights available, each with its own advantages and disadvantages:
- LED (Light Emitting Diodes): These are highly energy-efficient and produce less heat than other types. They can also be tailored to emit specific light spectrums optimal for plant growth.
- HPS (High-Pressure Sodium): These lights are great for the flowering stage due to their red and orange light spectrum. However, they can produce a lot of heat and may require additional ventilation.
- MH (Metal Halide): These lights emit a blue-white spectrum that is ideal for the vegetative stage of plant growth.
- CFL (Compact Fluorescent Lights): These are a good choice for small grow tents and for gardeners on a budget. They don’t produce much heat, but they’re not as efficient as LED or HPS lights.
| Grow Light Type | Pros | Cons |
|---|---|---|
| LED Lights | Energy-efficient and long-lasting Emit less heat Adjustable spectrum for different growth stages | Higher initial cost Limited penetration for dense canopies May require additional cooling |
| HPS Lights | High light intensity Affordable Suitable for flowering stage | Generate more heat Higher energy consumption Less energy-efficient compared to LED |
| Fluorescent Lights | Affordable Suitable for seedlings and clones Good light spectrum for plant growth | Limited light intensity Less energy-efficient Require more bulbs for larger grow areas |
If you have a 4×4 grow tent, you might want to check out the best LED lights for your setup.
Positioning Your Lights for Optimal Plant Growth
The positioning of your lights is just as important as the type of light you choose. Here are a few tips:
- Height: Keep your lights at the right height. If they’re too close, they can burn your plants. If they’re too far, your plants may not get enough light. The right height depends on the type of light and the stage of plant growth.
- Coverage: Ensure your lights cover all your plants evenly. You may need to adjust the position of your lights or use multiple lights for larger grow tents.
Ventilation: Ensuring Fresh Air for Your Plants
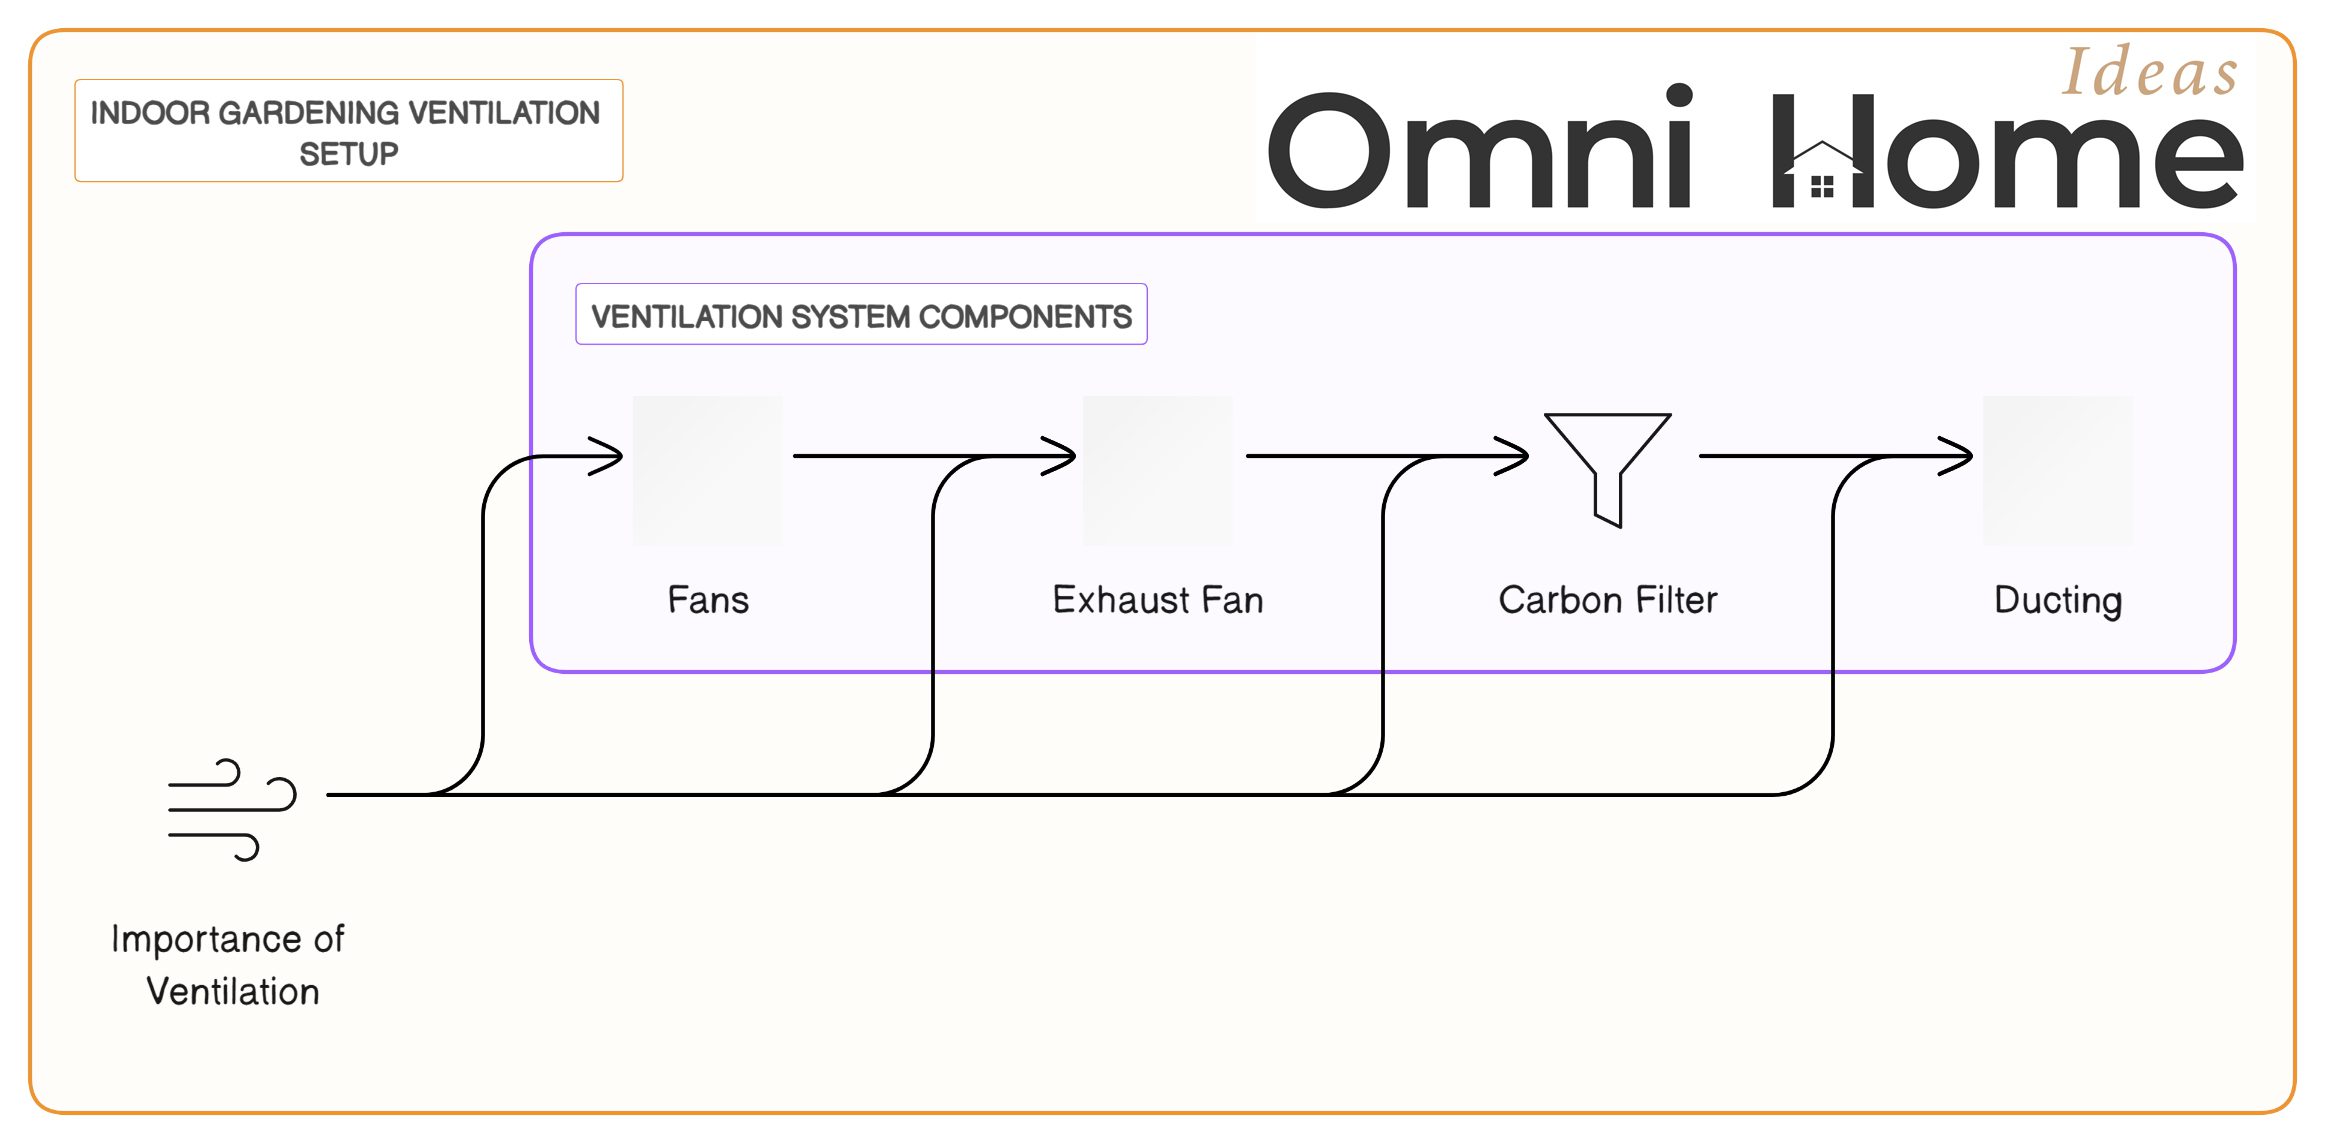
Importance of Proper Air Circulation
Just like us, plants need fresh air to thrive. Proper ventilation helps control temperature and humidity, reduces the risk of pests and diseases, and ensures your plants get plenty of carbon dioxide for photosynthesis.
Setting Up Fans, Filters, and Ducting
Here’s what you need for a basic ventilation system:
- Fans: These circulate air within the tent and help cool down your lights. Oscillating fans are a good choice as they distribute air evenly.
- Exhaust Fan: This removes hot air from the tent. It’s usually installed at the top of the tent, where hot air accumulates.
- Carbon Filter: This helps control odors. It’s usually connected to the exhaust fan.
- Ducting: This is used to connect your exhaust fan and carbon filter and to direct air out of the tent.
To help you calculate the proper airflow for your grow tent, you can use this handy grow tent room CFM calculator. If your grow tent is getting too hot, here’s a guide on how to cool it down.
Temperature and Humidity Control: Creating the Perfect Environment
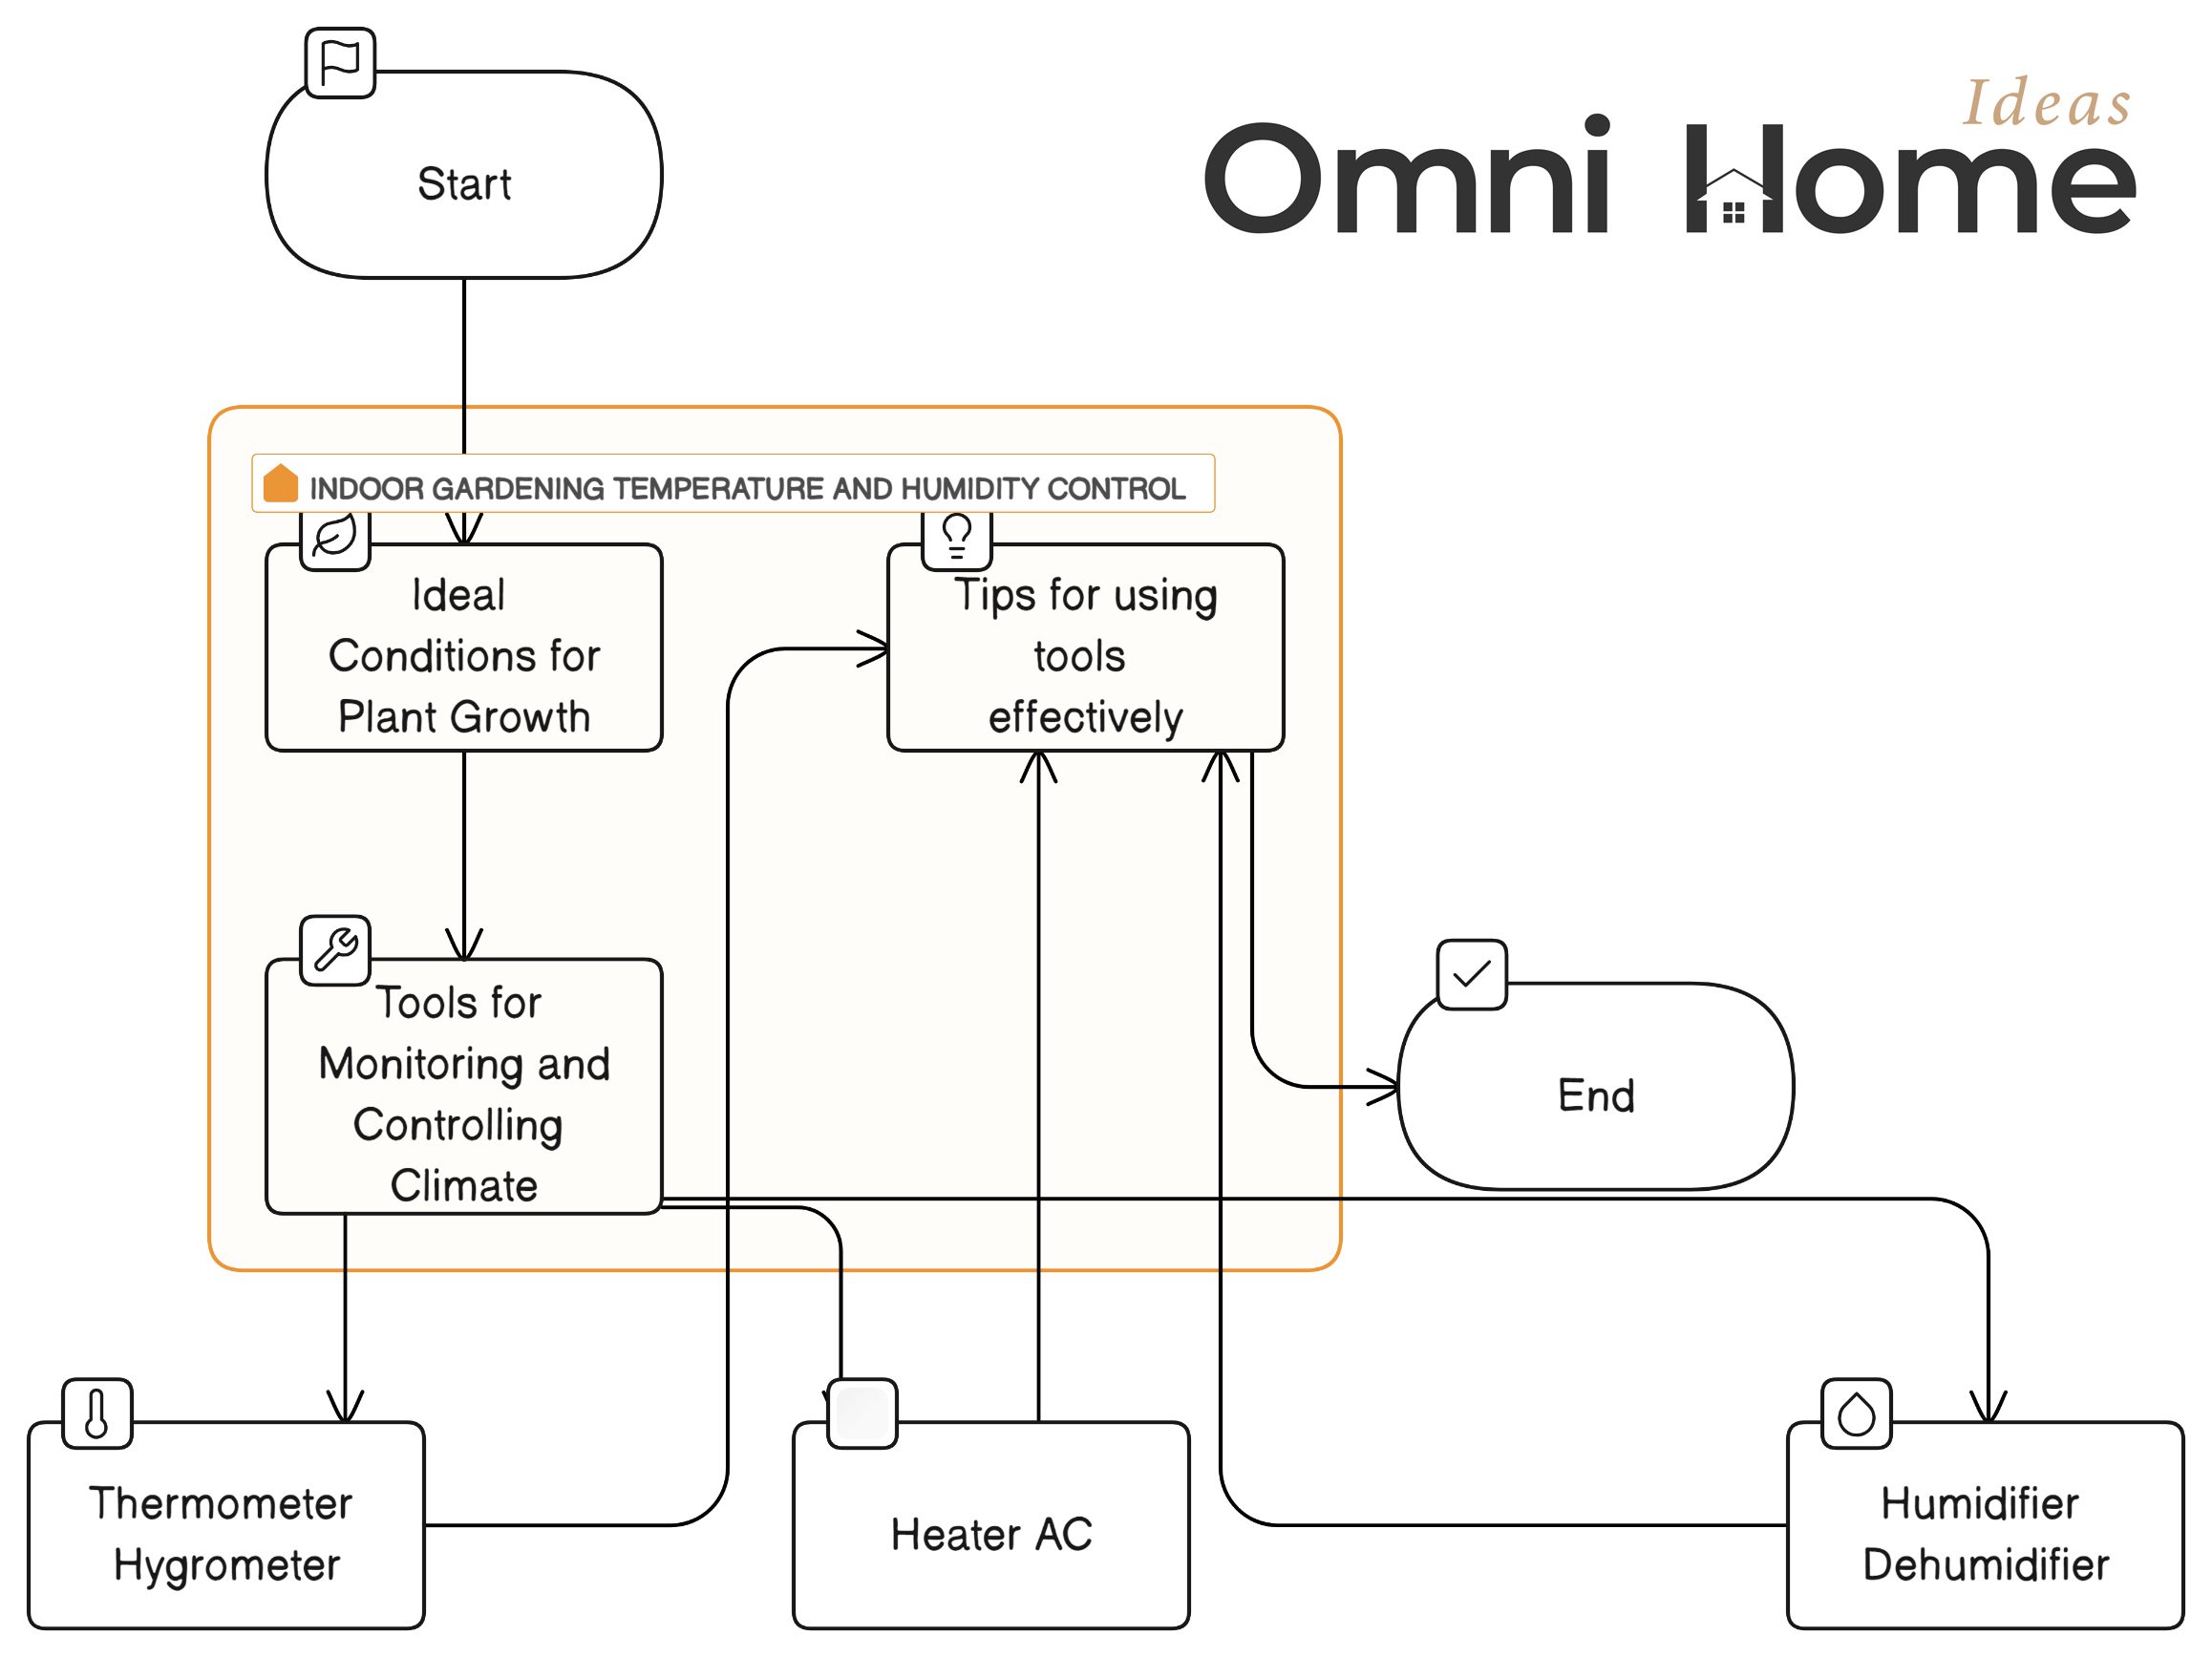
Ideal Conditions for Plant Growth
The ideal temperature for most plants is between 70-85°F during the light period and 10-15 degrees cooler during the dark period. As for humidity, seedlings prefer higher humidity (60-70%), while mature plants prefer lower humidity (40-50%).
Tools for Monitoring and Controlling Climate
To maintain the right conditions, you’ll need:
- Thermometer/Hygrometer: These measure temperature and humidity levels.
- Heater/AC: These can be used to adjust temperature.
- Humidifier/Dehumidifier: These can be used to adjust humidity. If you’re in need of a humidifier for your grow tent, check out this guide on the best humidifiers for grow tents.
If you’re struggling with low humidity levels, here’s a guide on how to increase humidity in your grow tent.
If you’re struggling with high humidity levels, here’s a guide on how to lower humidity in your grow tent.
Planting Medium: Soil, Coco Coir, or Hydroponics?
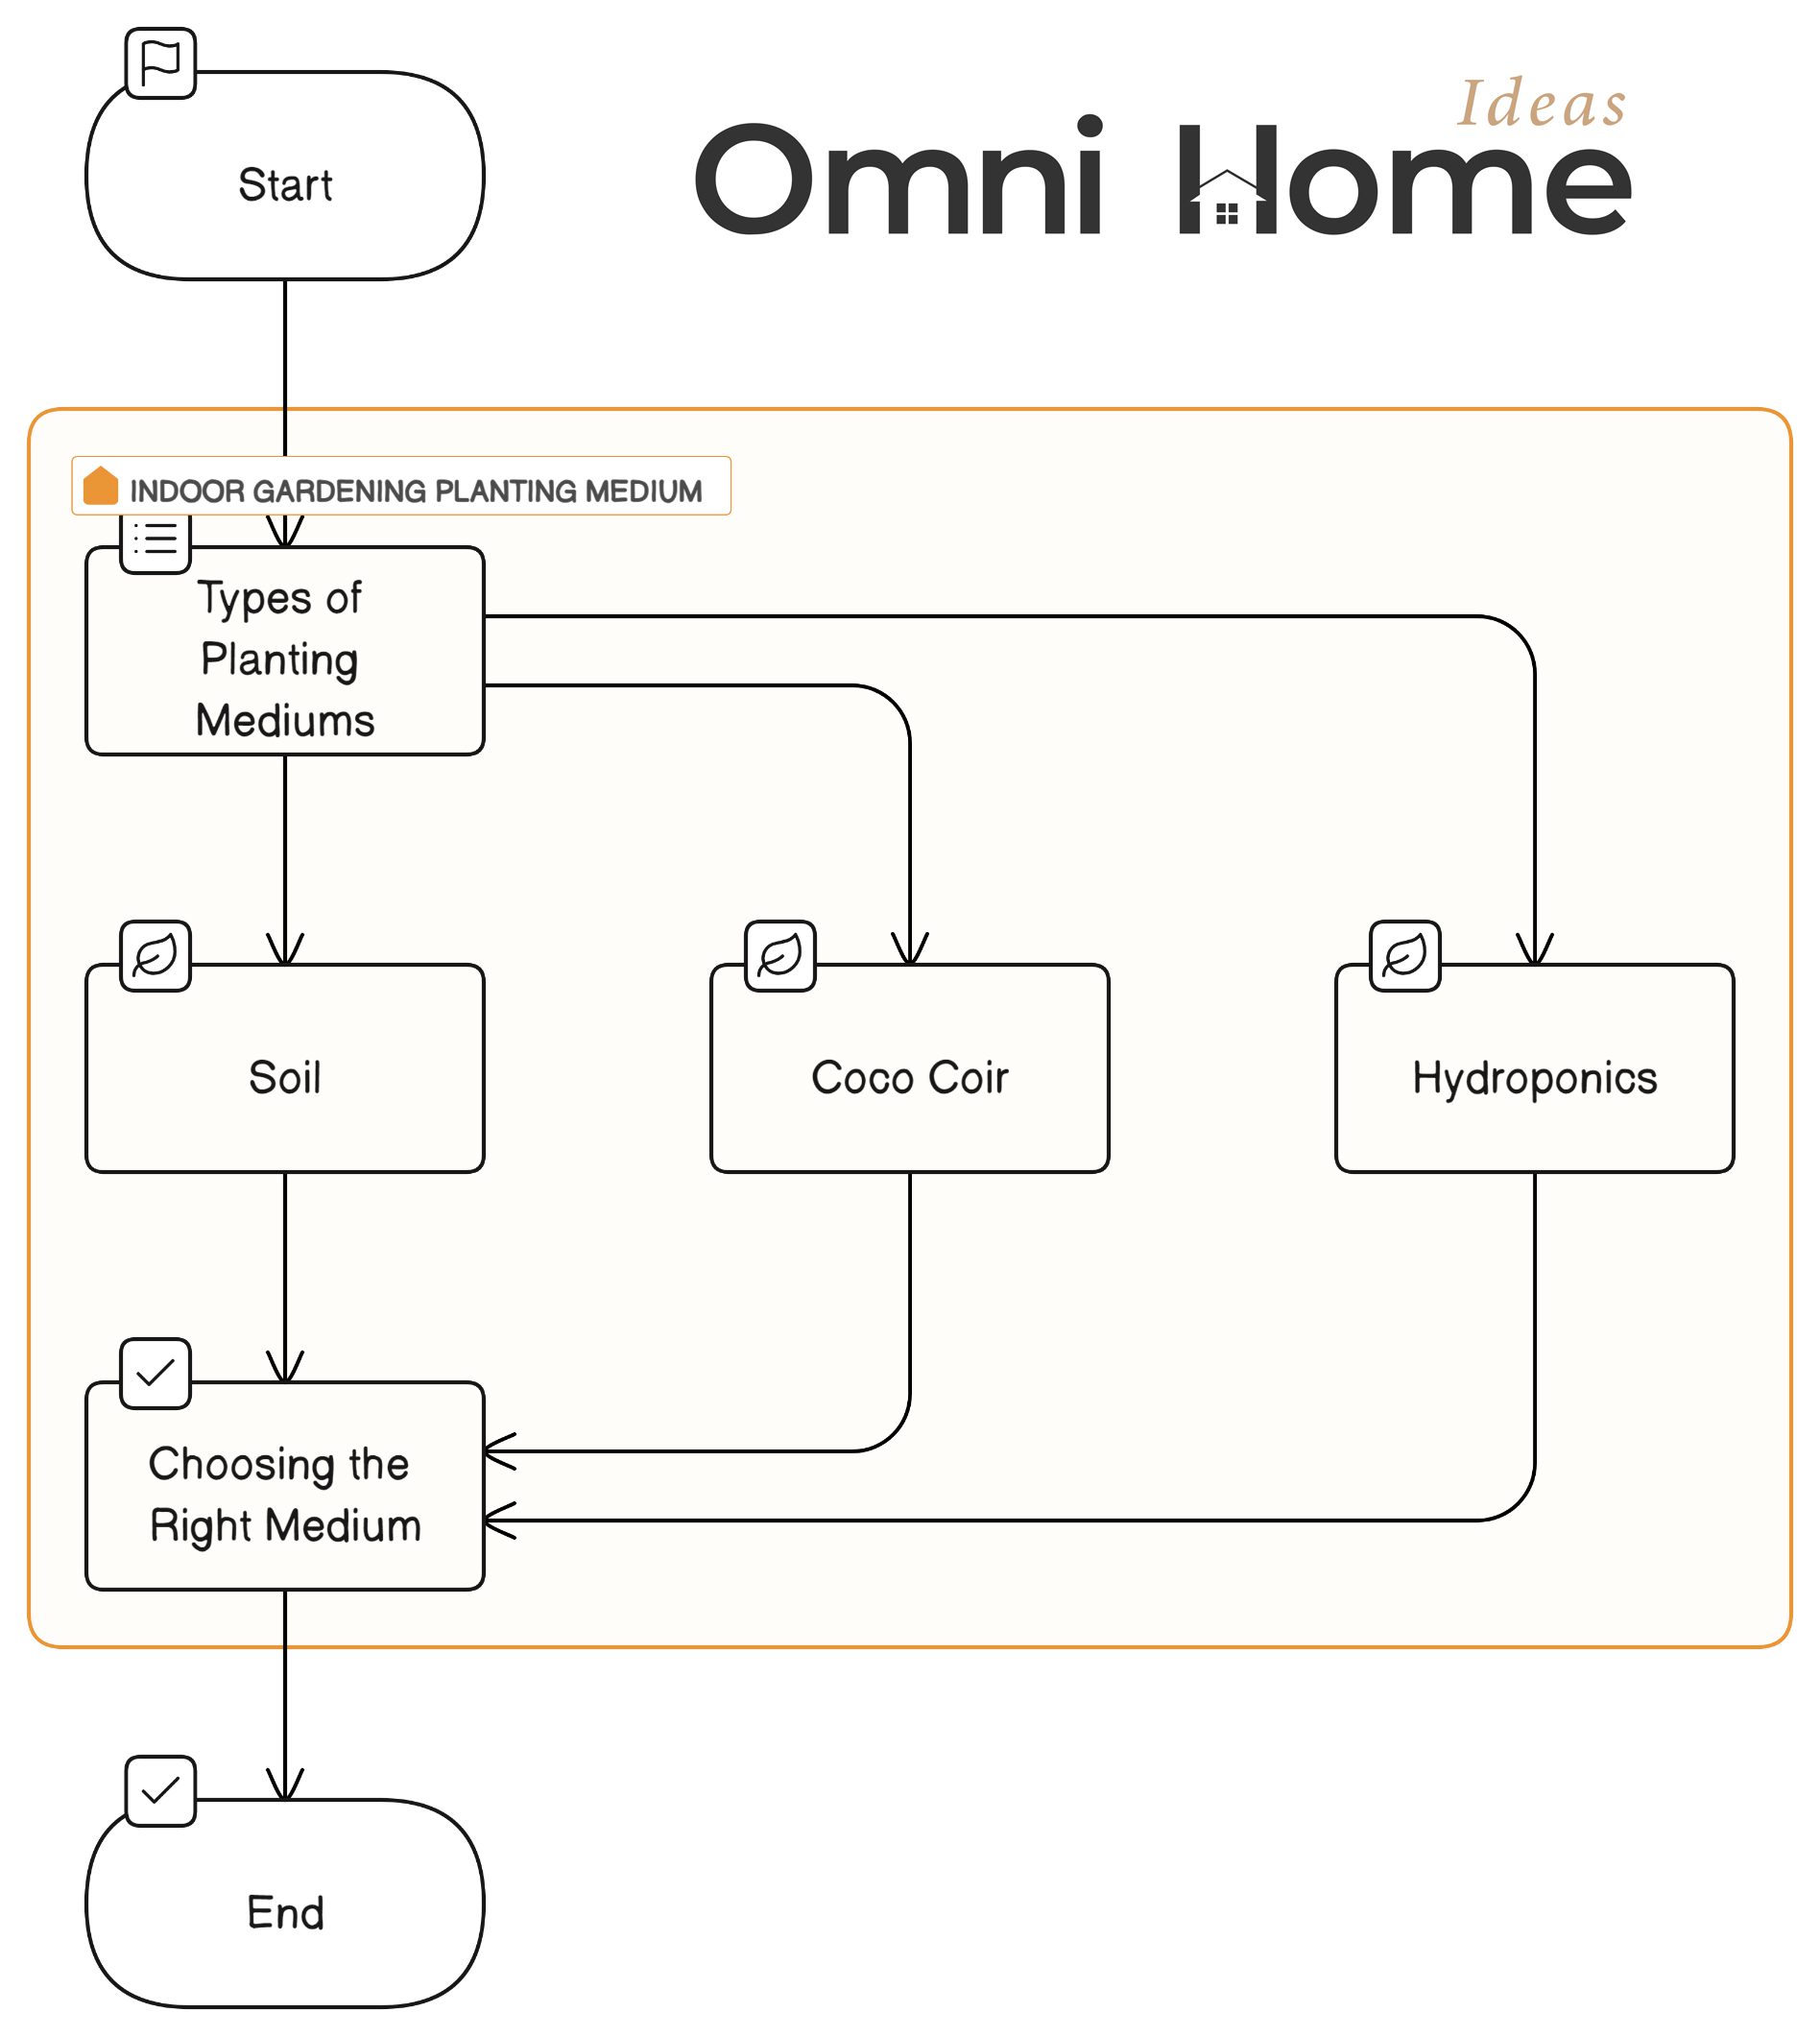
Pros and Cons of Different Planting Mediums
- Soil: It’s easy to use andcontains nutrients, but it can be messy and prone to pests and diseases.
- Coco Coir: This is a sustainable, pH-neutral medium that promotes root growth. However, it doesn’t contain nutrients, so you’ll need to add them.
- Hydroponics: This soil-less method can result in faster growth and higher yields. However, it requires more equipment and maintenance.
Choosing the Right Medium for Your Plants
The right medium depends on your plants, your resources, and your level of expertise. Soil is a good choice for beginners, while coco coir and hydroponics may be suitable for more experienced gardeners. Always research your plants’ specific needs before choosing a medium.
Stay tuned as we delve into the step-by-step process of setting up your grow tent in the next section. We’re just getting started!
The Step-by-Step Guide to Setting Up Your Grow Tent
Choosing the Perfect Location for Your Grow Tent
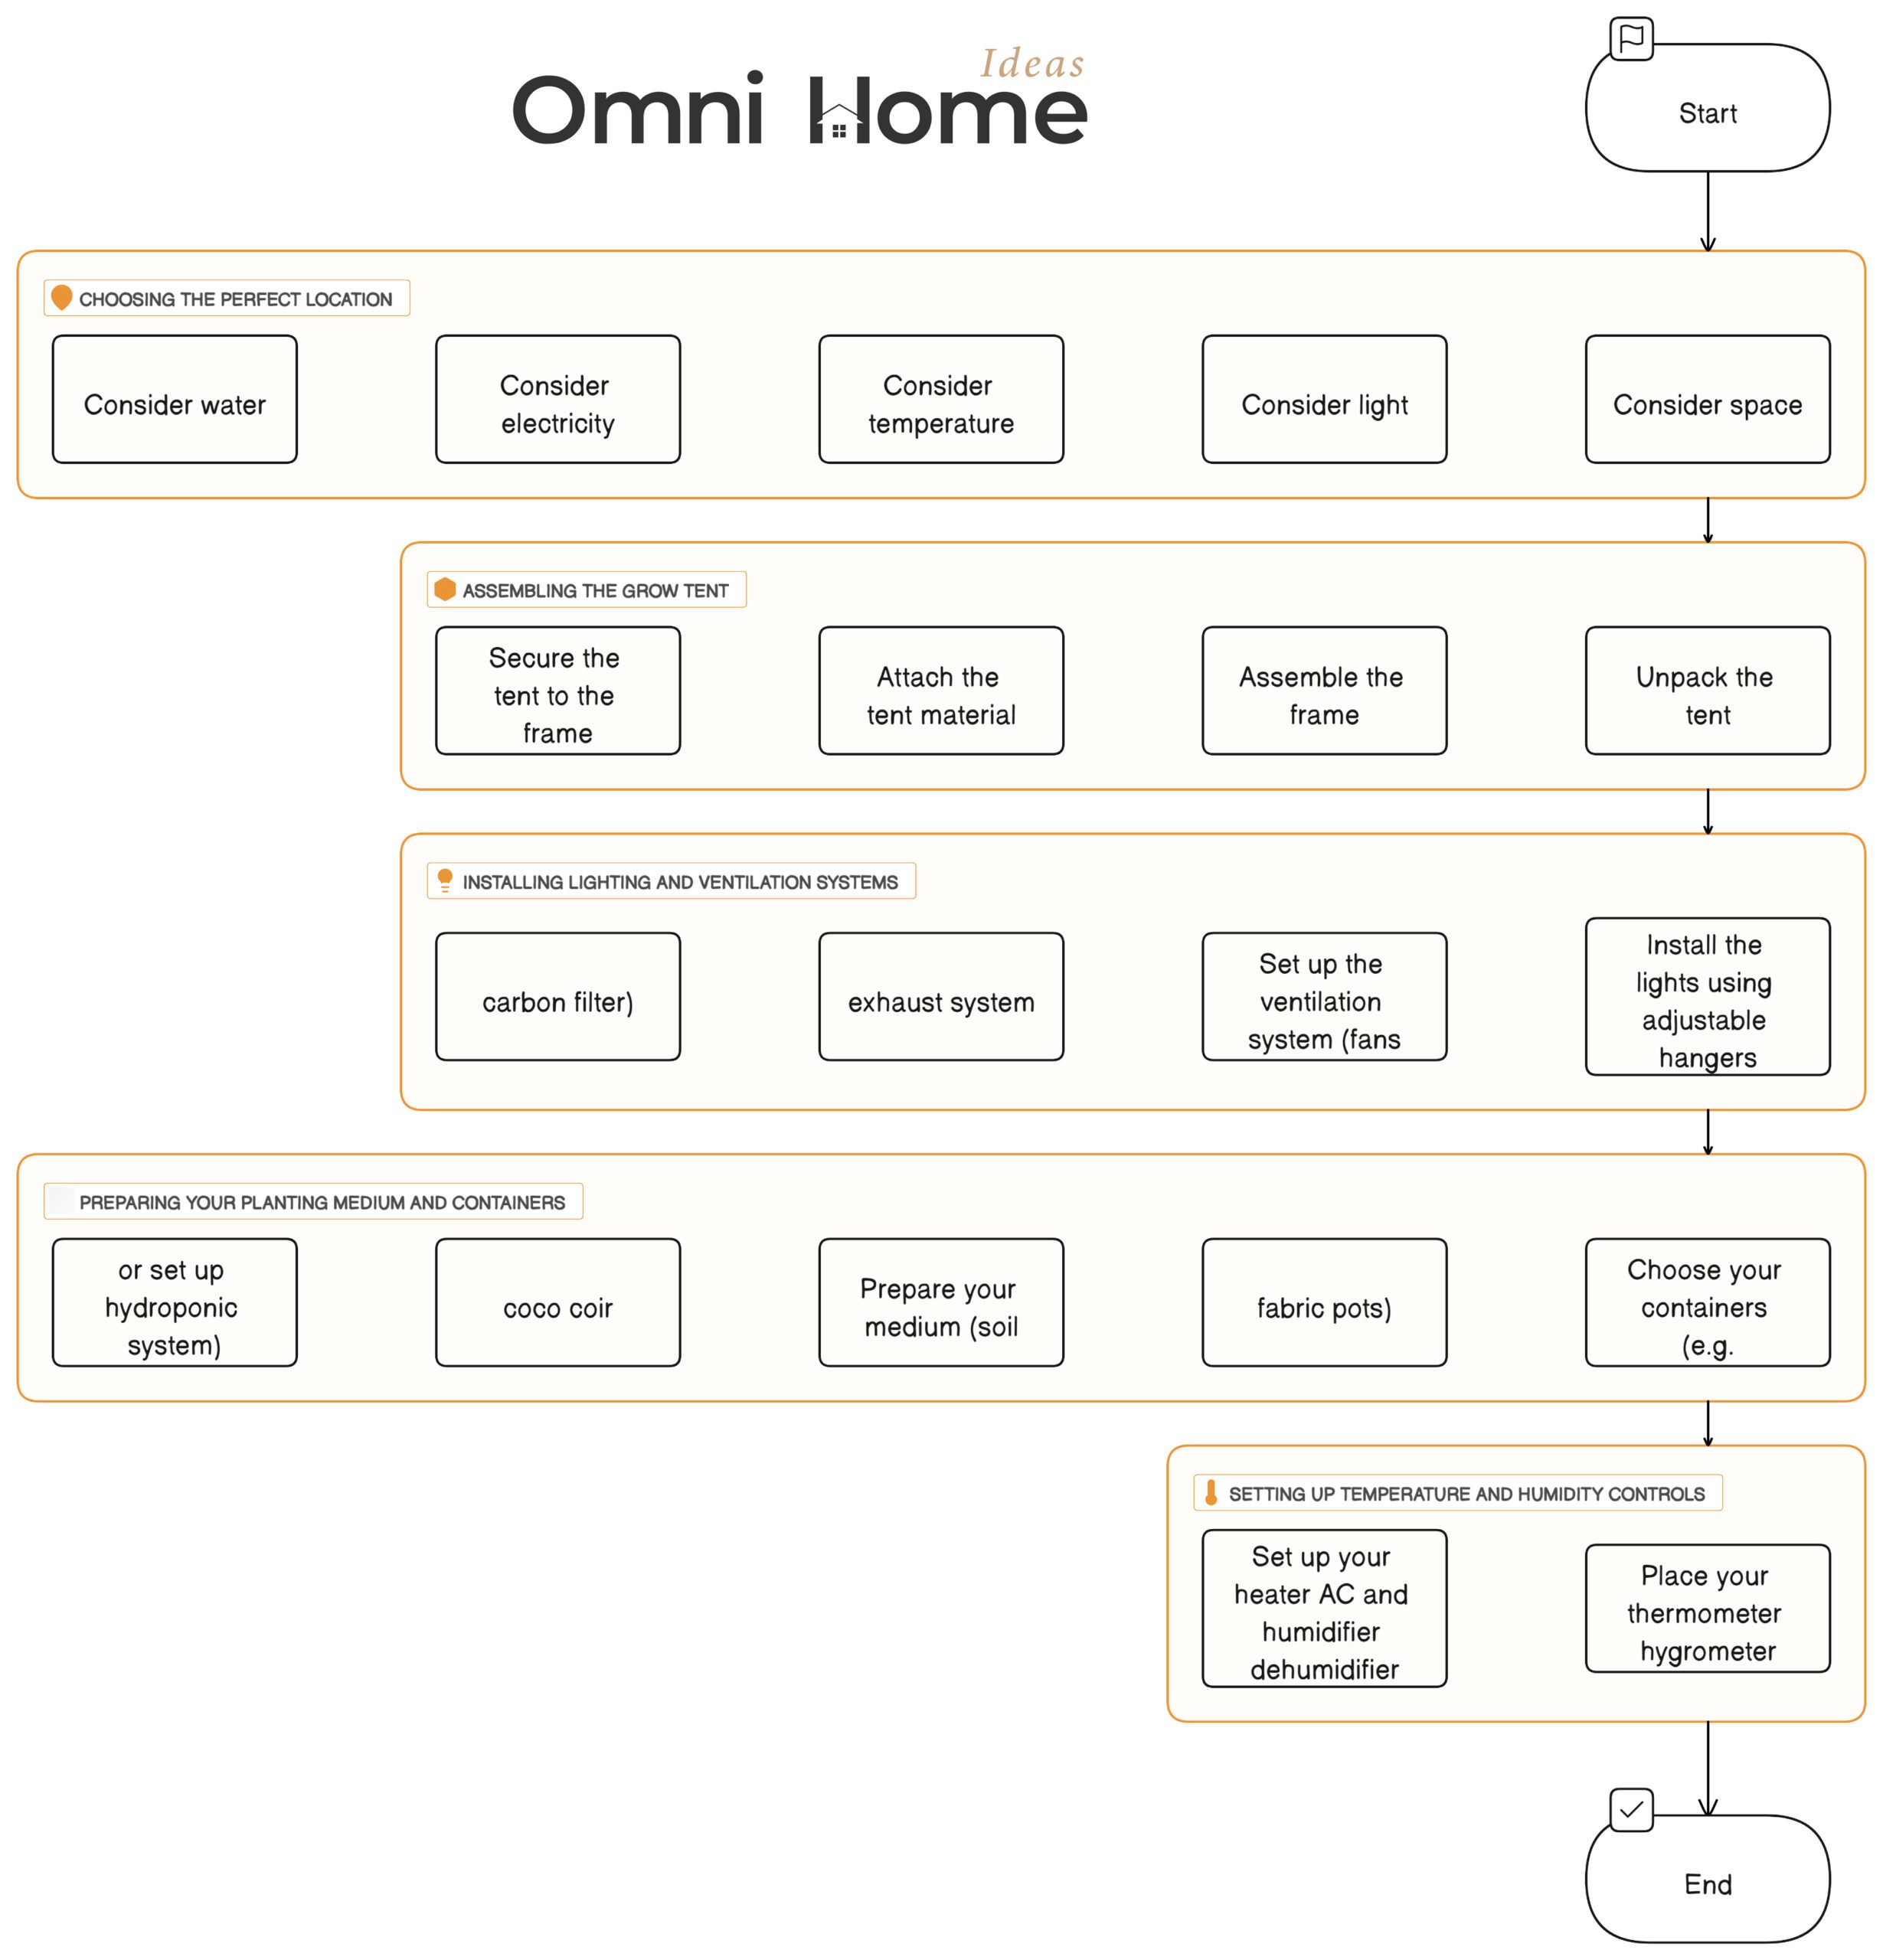
The first step in setting up your grow tent is choosing the right location. Here are a few things to consider:
- Space: Ensure you have enough space for the tent itself and for moving around it. Remember, you’ll need to access your tent for plant care and maintenance.
- Light: Choose a dark space if possible to maximize the effectiveness of your grow lights.
- Temperature: Avoid areas with extreme temperature fluctuations. Basements, for example, can be too cold, while attics can be too hot.
- Electricity: You’ll need access to electrical outlets for your lights, fans, and other equipment.
- Water: If possible, choose a location near a water source for easy watering and humidity control.
Assembling the Grow Tent: A Detailed Walkthrough
Now, let’s get to the exciting part – assembling your grow tent. While the exact steps can vary depending on your tent model, here’s a general guide:
- Unpack the Tent: Carefully unpack the tent and make sure all parts are included.
- Assemble the Frame: Start by assembling the tent’s frame following the manufacturer’s instructions.
- Attach the Tent: Once the frame is assembled, attach the tent material. Make sure the zippers are functioning properly.
- Secure the Tent: Secure the tent to the frame, ensuring it’s taut and stable.
Installing Lighting and Ventilation Systems
With your tent assembled, it’s time to install your lighting and ventilation systems:
- Install the Lights: Hang your lights from the top of the tent using adjustable hangers. This allows you to change the height of the lights as your plants grow.
- Set Up the Ventilation: Install your fans, exhaust system, and carbon filter. Remember, hot air rises, so place your exhaust fan near the top of your tent.
Preparing Your Planting Medium and Containers
Next, prepare your planting medium and containers:
- Choose Your Containers: Fabric pots are a great choice as they allow for better aeration and prevent overwatering.
- Prepare Your Medium: If you’re using soil or coco coir, fill your pots with the medium. If you’re using hydroponics, set up your hydroponic system according to the manufacturer’s instructions.
Setting Up Temperature and Humidity Controls
Finally, set up your temperature and humidity controls:
- Place Your Thermometer/Hygrometer: Place these tools in a location where they can accurately measure the conditions inside the tent.
- Set Up Your Heater/AC and Humidifier/Dehumidifier: If you’re using these tools, set them up according to the manufacturer’s instructions.
Congratulations! You’ve set up your grow tent. Now, you’re ready to start planting. In the next section, we’ll discuss how to care for your plants and maintain your grow tent.
Maintaining Your Grow Tent for Optimal Results
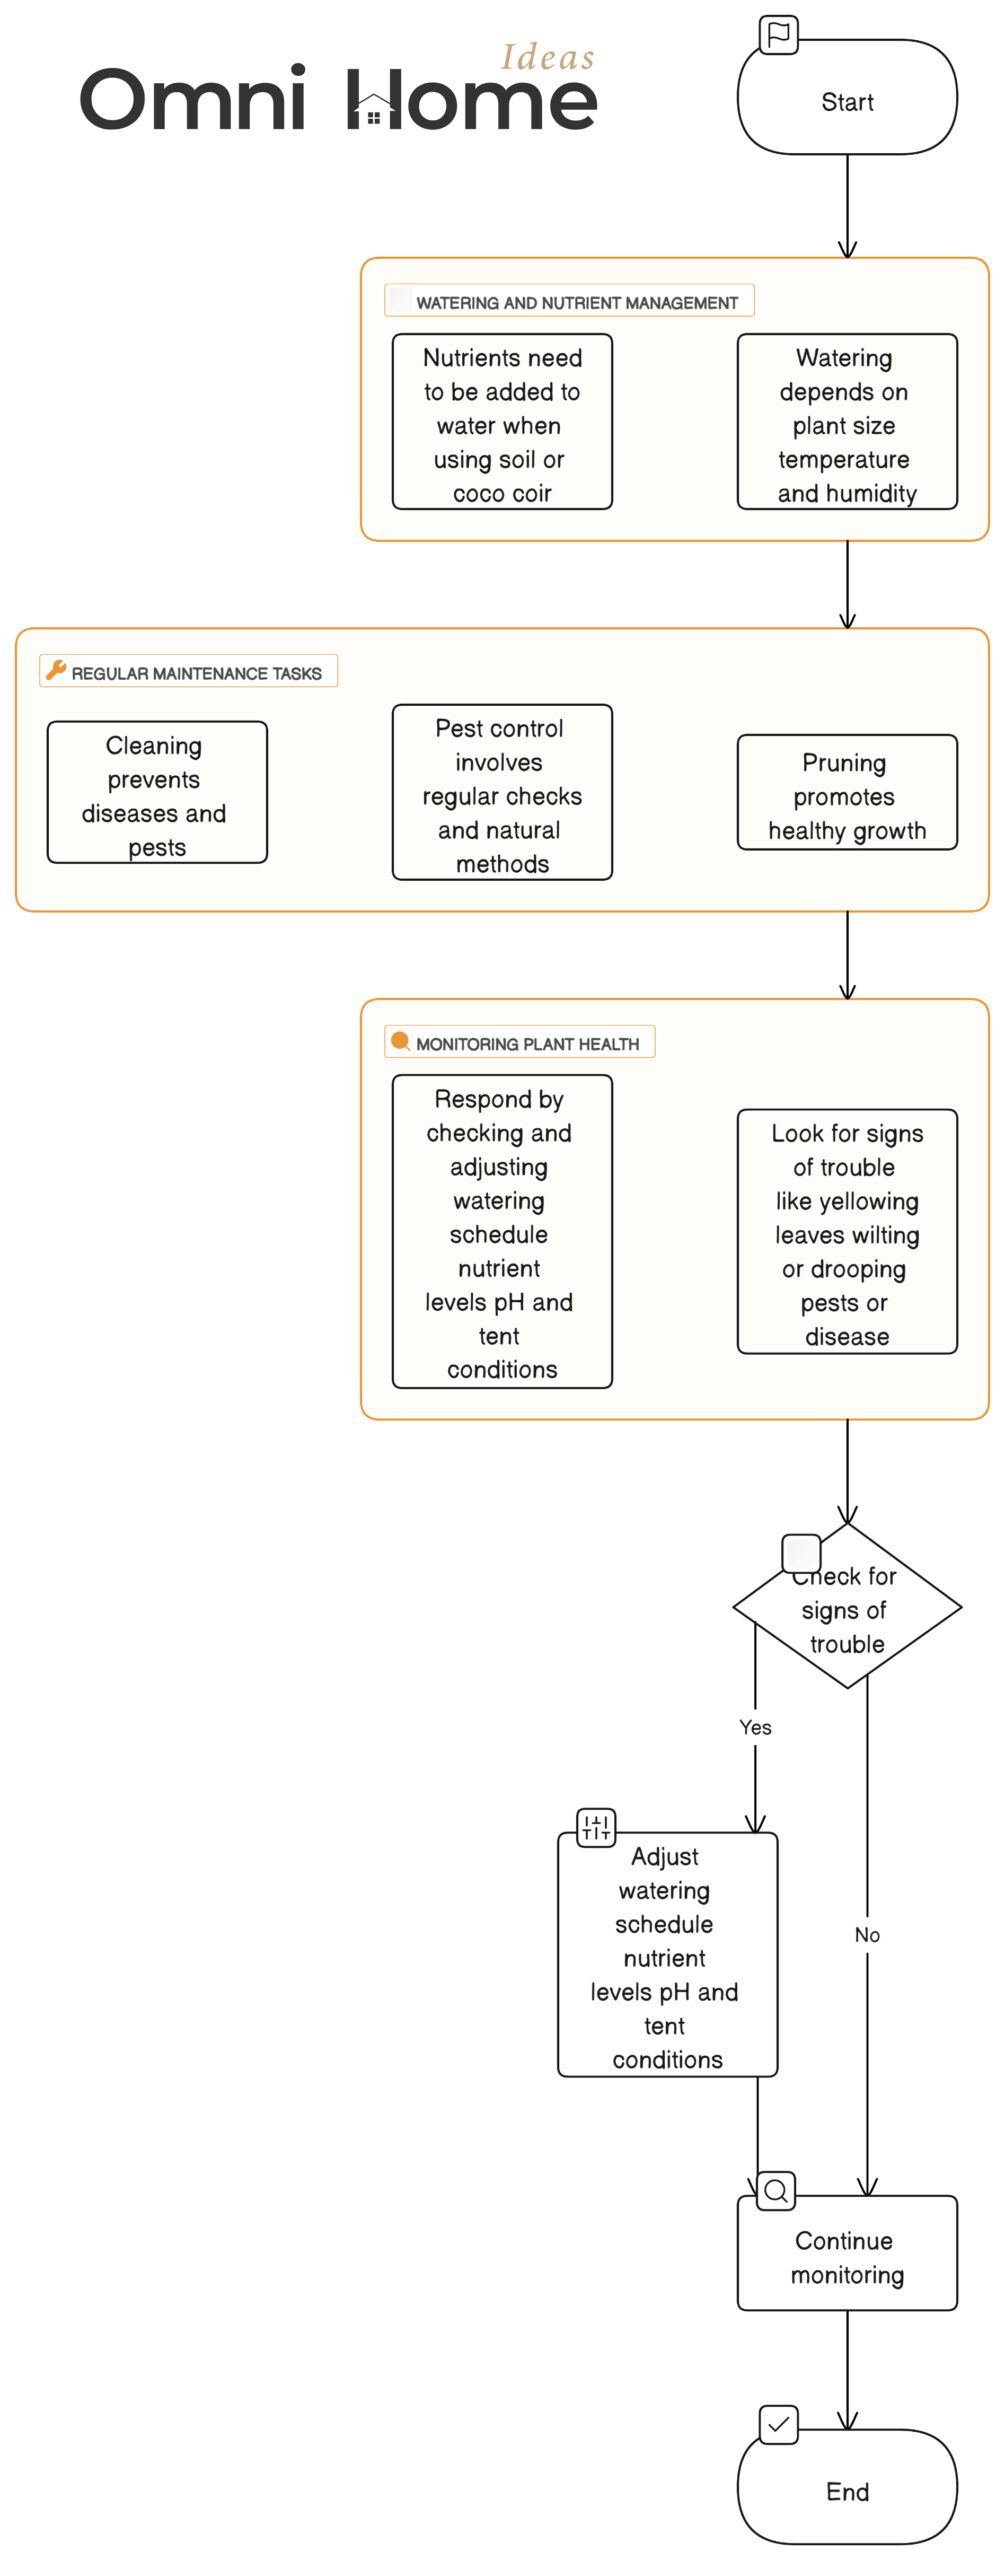
Watering and Nutrient Management: Keeping Your Plants Healthy
Watering and nutrient management are crucial for your plants’ health. Here’s what you need to know:
- Watering: The amount of water your plants need depends on their size, the temperature, and the humidity in your tent. As a general rule, it’s better to underwater than overwater. Overwatering can lead to root rot and other problems.
- Nutrients: If you’re using soil or coco coir, you’ll need to add nutrients to your water. Follow the nutrient manufacturer’s instructions, and remember, it’s better to start with less and add more as needed.
Regular Maintenance Tasks: Pruning, Pest Control, and Cleaning
Maintaining your grow tent involves regular tasks like pruning, pest control, and cleaning:
- Pruning: Regularly prune your plants to promote healthy growth. Remove dead or yellowing leaves, and consider training techniques like topping or low-stress training to maximize your yield.
- Pest Control: Check your plants regularly for signs of pests. If you spot any, use a natural pest control method like neem oil or introduce beneficial insects into your tent.
- Cleaning: Keep your grow tent clean to prevent diseases and pests. Regularly clean your tent’s interior, remove plant debris, and sanitize your tools.
Monitoring Plant Health: Signs of Trouble and How to Respond
Finally, always keep an eye on your plants’ health. Here are some signs of trouble and how to respond:
- Yellowing Leaves: This could be a sign of nutrient deficiency, overwatering, or a pH imbalance. Check your watering schedule, nutrient levels, and pH and adjust as needed.
- Wilting or Drooping: This could be due to underwatering, overwatering, or temperature stress. Check your watering schedule and tent conditions.
- Pests or Disease: Look for signs like spots, discoloration, or pests on your plants. If you spot any, identify the problem and treat it as soon as possible.
Remember, the key to a successful grow tent setup is regular monitoring and maintenance. Stay attentive to your plants’ needs, and they’ll reward you with a bountiful harvest.
Harvesting: The Fruit of Your Labor

When and How to Harvest Plants from Your Grow Tent
Harvesting is the most rewarding part of the process. Here’s how to do it right:
- When to Harvest: The right time to harvest depends on your plants. For many plants, look for changes in leaf color and flower development. Research your specific plants to know the best time to harvest.
- How to Harvest: Use clean, sharp scissors or pruning shears to cut the plants. Handle your harvest gently to avoid damaging the fruits, flowers, or leaves.
Post-Harvest Care for Your Grow Tent
After harvesting, it’s important to care for your grow tent:
- Clean the Tent: Remove plant debris and clean the interior of the tent.
- Check Your Equipment: Make sure your lights, fans, and other equipment are still in good working order.
- Prepare for the Next Cycle: If you’re planning to plant again, prepare your planting medium and containers.
Common Mistakes to Avoid When Setting Up a Grow Tent

Avoiding Overcrowding: Understanding Plant Spacing and Tent Size
One common mistake is overcrowding your grow tent. Each plant needs enough space to grow and receive adequate light. Consider the mature size of your plants and the size of your tent to avoid overcrowding.
Overwatering and Underwatering: Striking the Right Balance
Both overwatering and underwatering can harm your plants. It’s important to understand your plants’ water needs and monitor the moisture level of your planting medium.
Lighting Mistakes: Avoiding Burn and Light Stress
Light is crucial for plant growth, but too much light or lights that are too close can cause burn and light stress. Use the right type of lights for your plants and adjust the height of your lights as your plants grow.
Remember, everyone makes mistakes, especially when starting out. Don’t be discouraged if things don’t go perfectly. Learn from your mistakes, and keep improving. You’re on your way to becoming a grow tent pro!
Conclusion
We’ve covered a lot in this guide, from the basics of grow tents and their essential components to the step-by-step setup process, maintenance tasks, common mistakes to avoid, and the exciting moment of harvesting. Remember, the key to a successful grow tent setup is understanding your plants’ needs and providing the right conditions for them to thrive.
Setting up and maintaining a grow tent is a journey, not a destination. It’s a continuous process of learning, experimenting, and improving. But the rewards are worth it: fresh, homegrown produce, the satisfaction of nurturing life, and the joy of seeing your plants grow and thrive. So embrace the green thumb lifestyle, and happy growing!
Further Reading
- For enthusiasts looking to optimize their grow tent environment further, understanding the role of humidity is crucial. Get deeper into maintaining the ideal humidity levels for your plants with our comprehensive guide on the ‘Best Humidifier for Grow Tent’ on our Reddit community. This guide offers insights into selecting the right humidifier to support healthy plant growth and development. Read more about it here.
- Explore our comprehensive guide on the Best LED Lights for a 4×4 Grow Tent to ensure optimal light distribution and plant growth, enhancing your grow tent setup.
